
So for a loong time, I’ve been wanting to build a demo using touch to draw on a canvas, and making it collaborate with socket.IO. This blogpost will cover the first part - building a whiteboard-canvas you can draw on… (look out for the follow up post about socket.IO).
The canvas-element is part of HTML5, so off cause its by definition super cool. The support is actually not that bad - if you can live with IE9+ you are pretty much good to go - see full chart here http://caniuse.com/canvas. (this covers the 2d canvas - sadly for the übercool 3d canvas, better known as webGL, the support is still horrible). For reference, everything regarding canvas in this blogpost will be about the simple 2d kind…
The canvas-element is just like the img-element, except for one thing => it doesn’t take an src-attribute for determining what to draw, it relies on javascript for drawing. Other than that it behaves like the img-tag (you can style it etc.). Many people mistakenly thinks that canvas itself can “animate for you”. Canvas doesn’t handle tweens, or objects for that matter. It only takes a small set of very simple drawing instructions and displays that. To animate with canvas, you will typically setup a rendering loop that does all of this, and runs at a given interval or at every frame the browser paints (using requestAnimationFrame - best practice, right there for you). For a whiteboard there is no animation - we will simply you draw where you put your finger.
So, lets get into the code. We start by creating a canvas element, setting a size, and putting it in the dom (or you reference a canvas-element thats already in your DOM - your choice).
var canvas = document.createElement('canvas');
canvas.width=600;
canvas.height=480;
document.body.appendChild(canvas);
Then we get “drawing context” (we call it ctx). The context is a little bit of a weird concept to understand, but for the time-being just think of it as your “access” to draw on the particular canvas, or the “tool” you draw with, (that can take or change different form, style etc). We set properties and call functions on it sequentially to draw the final image.
var ctx = canvas.getContext('2d');
Now lets just demo how to draw - lets draw a yellow rectangle that will act as the background color (by default canvas-elements are transparent - read: you can stack them if you want). First we set the fillStyle to yellow, and the we call the fillRect() function with four parameters which is the x and y coordinates to start at, and the width and height of the desired rectangle.
ctx.fillStyle = 'rgb(255,255,0)';
ctx.fillRect(0,0,600,480);
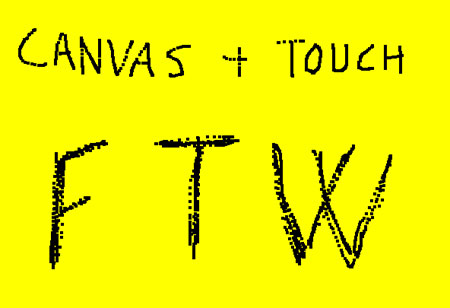
Yellow canvas FTW. Drawing a rectangle is the basics of our whiteboard. All we need is to listen for touch-events (touchmove and touchstart) and repeatedly call a draw-function to draw multiple small rectangles based on the touch-position. Could look something like this (we start of setting the fill style to black so we don’t draw with the background-color.
ctx.fillStyle = 'rgb(0,0,0)';
function draw(x,y) {
  ctx.fillRect(x,y,4,4);
}

canvas.addEventListener('touchmove', function(e) {
  draw(e.touches[0].pageX-e.target.offsetLeft, e.touches[0].pageY-e.target.offsetTop);
});
canvas.addEventListener('touchstart', function(e) {
  draw(e.touches[0].pageX-e.target.offsetLeft, e.touches[0].pageY-e.target.offsetTop);
});
The touch-events have contain a touches-array that has the pageX and pageY of the touch. To get the position on the canvas subtract this value from the canvas position (offset).
Thats it - whiteboard is ready to be used. Demo here: http://codepen.io/filipbech/full/wtoDz/
Ideas (and hints) for you to build on from this point.
- clear button
- also listen to mouse-events
- save image to disk (a little more complex) - or persist to localstorage
- option to change the drawing color
If you want to learn a little bit about canvas animation and the math involved, check out this great talk: http://www.youtube.com/watch?v=sLt9WeyGVEQ