
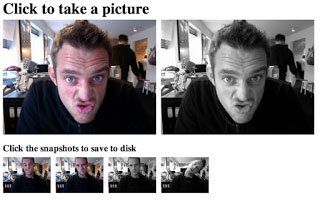
So I want to do this… use the web camera to get a live video-stream of the user, put a filter on it (grayscale for the sake of simplicity for this demo) and be able to save it to disk, without ever touching the server.
For those just looking for the demo, go play with it on codepen. http://codepen.io/filipbech/full/jpaiD
The first part of this is getting the users video to display on the page. Thats straight forward with a call to getUserMedia, and then assigning the returned stream as a source to a regular video-element via createObjectURL.
  var streamReady = function(stream) {
    videoEle.src=window.URL.createObjectURL(stream);
  }
  navigator.getUserMedia({'video':true},streamReady);
  // beware of the shims for the various prefixes needed (getUserMedia and createObjectURL).
The second part is about applying a filter to the video. My first approach was to simply use the css filters that available in modern browsers. It sure was simple, but since the effect was applied in the presentation of the video, the frame-grabs (part three) didn’t have the filter applied, and since we wanted to be able to save it to disk, we needed another solution. Canvas to the rescue. For each frame (read recurring loop) we look at the video and pixel by pixel apply the filter to the canvas element. (since we can’t look at individual pixels on a video-element, I actually have a hidden extra canvas element that just duplicates the video-element frame by frame, and from which we can read pixel-by-pixel). For the sake of simplicity in the demo, I only have óne filter, but a quick google search will give lots of examples of other canvas-filters. You can add multiple effects simultaneously - the sky is the limit (and the cpu of the client, since with 25/30fps you have somewhere between 30-40ms pr. frame.) Look at the demo to see the source - its pretty self-explanatory.
The third part was capturing a still. Since we already know the feature of putting the contents of a video-element into a canvas-elements, this is a no-brainer. To make the code more DRY, I actually made this grab a frame from the canvas-element in stead (remember we have a filtered canvas, but also a hidden clean version). Its still pretty straight-forward.
  function takeSnapshot(fromEle) {
    // create the new canvas-element, and set appropriate width and height
    var c = document.createElement('canvas');
    c.width=320;
    c.height=240;

    // get the imageData from the "fromEle" and put it in the canvas we just created
    var imageData = fromEle.getContext('2d').getImageData(0,0,320,240);
    c.getContext('2d').(imageData, 0, 0);

    // append it to the DOM
    snapshots.appendChild(c);
  }
The fourth and final part is saving that to disc. For simplicity (and because - you know - I’m lazy) I turn to a couple of helper-librariess. Eligrey on github, has you covered. https://github.com/eligrey/canvas-toBlob.js/, https://github.com/eligrey/Blob.js/, https://github.com/eligrey/FileSaver.js
With these libraries saving to disk, is as simple as
  function saveToDisk(canvas) {
    canvas.toBlob(function(blob) {
      saveAs(blob, (canvas.name) + ".jpg" );
    }, "image/png");
  }
For the sake of making the demo a lot simpler Im using jQuery to assign the event listener (since event-listeners on dynamic elements is a lot easier with query)
  jQuery('.photos canvas').on('click',function() {
    saveToDisk(this);
  });
See it all put together at codepen: http://codepen.io/filipbech/full/jpaiD